A Mom and a Family of Men!

Showing posts with label Science. Show all posts

Thursday, September 15, 2011

Creature Moment With Remy


He kept this guy around for about a month before we made him set the little guy free. He does very well with his captives, but I told him it was fast approaching fall and the frog needed to make plans. ;)


Photobucket


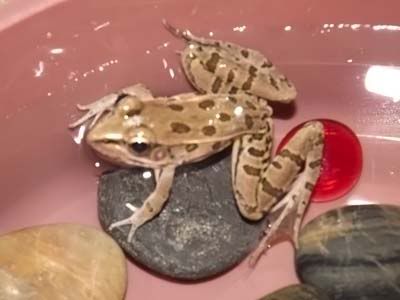
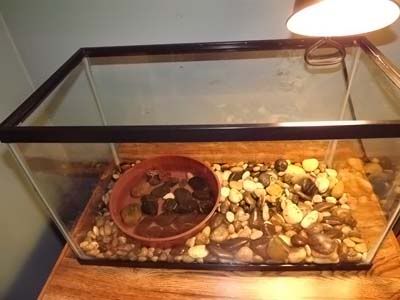
He set him up a little habitat as he always does. :)


Photobucket


I think the frog liked it better with Remy than in the wild.

Tuesday, July 12, 2011

Kitchen Science Day 2


I finally made it to day 2 of my kitchen science. Time is not my friend right now.


Day 1 was so long ago. But the boys remembered what we learned.


You will need:
Photobucket


*two small glasses
*labels
*pencil
*teaspoon measure
*baking soda
*baking powder
*orange juice (later)


Photobucket


Put one teaspoon of baking powder into one glass and one teaspoon of soda into the other.


We learned that baking powder fizzed more because it is an acid and a base. When it became wet, it fizzed. The soda did not because water is not an acid.


Photobucket


Next, we rinsed the glasses and filled them with orange juice.


We repeated the same experiment.


Photobucket


This time we found the acid from the orange juice made the base from the soda react much more than the baking powder which already contained an acid and a base. We really thought the powder would react much better since it was double the acid.


Then, Matthew had the clever idea to get the tums and mash them into a powder. He added the tums powder to the juice.


Photobucket


Seriously, no wonder my throat was on fire the whole pg. I had the worst heartburn with each boy, each time it was worse. With Noah it about killed me. I was doing all the natural stuff I could find, nothing worked. I started living on the TUMS. Now, they were not doing much, but I was desperate. I will never use them again after this experiment. They do not quelch acid in the tummy, they make it worse! That fizz came up fast and almost came out of the glass! We were all shocked! I also believe it caused calcifications on my placenta.


Here is the line up:


Photobucket


Wednesday, June 22, 2011

Glowing Mushrooms


The things I learn with my children...


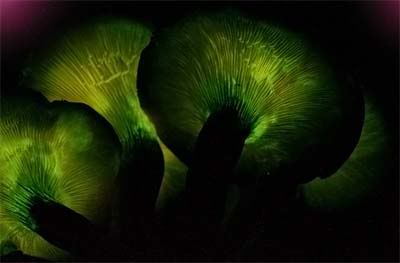
Yes, it is true, mushrooms can glow. I was quite shocked to see they were like glowsticks of the fungi variety. In science we are studying light. We were learning about things that are luminescent. Elijah and I just looked at one another and exclaimed, "A mushroom can glow?" I love those neat science moments that blow our minds.


Meet the Jack-O-Lantern Mushroom...


Photobucket


Our research shows that the gills of the mushroom are what lights up. It does so by almost the same process as the firefly does.


Photobucket


Monday, June 20, 2011

Light Unit ~ Elijah


We started a unit on light. :) The title of it is called, "Let There Be Light". I love that, too cute!


You will need:


Photobucket


* A light
* Glass of milk
* Glass
* Book


I had Eli shine his pen light from the top of the drinking glass through to the table. I asked him what happened. He said the object was transparent because it allowed the light to pass right through it.


Photobucket


We did the same thing with the book. He remembered that something that doesn't allow light to pass through is called opaque.


Photobucket


Next, I had him pour his soymilk into the glass he had used before. He held the pen light under the bottom of the glass of milk. He decided the milk diffused and scattered the light.


Photobucket


He also thought the light through the milk was pretty. It was. :) After we were done he put 8 carbs into his insulin pump and enjoyed the milk. ;) YUM!

Sunday, June 19, 2011

Puppy Prints


Elijah's mammal study has been so enjoyable. He was so excited to make prints of Rommie's paws since he saw the experiment in his book. Now he wants to walk around and find animal prints all over and take more print casts. I think that would be AWESOME!


You will need:
*Some sort of mold. We made one out of an old frozen strawberry container. Just cut off the bottom and it will work.
*Water to pour on the ground and for the plaster
*Plaster of Paris
*A willing Puppy


Photobucket


Photobucket


We tried making a print with not wetting the earth and with water. The water made for a better print. Our ground was so dry because we are in a dry patch here this summer.


Photobucket


Take that mold you made earlier and place it around the paw print carefully.


Photobucket


Now mix up your plaster and pour it in.


Photobucket


Photobucket


Now you just wait. A little while later...


Photobucket


The book told us to use sand. Dry sand at that. the dry didn't make a print at all. the sand that we sprinkled some water on was a little better.


Photobucket


Photobucket


As you can see the print wasn't as impressive.


Photobucket


As I type this Matthew just came back with the boys and they found some prints in the creek. They are making up plaster as I type. Hee hee...stay tuned!


Chalk Animals


We decided to get the sidewalk chalk out and measure out how big some mammals are. We started with the biggest mammal. :)


Photobucket


Photobucket


Can you guess who would stretch from our street to our house???


Photobucket


I bet you know now!


Photobucket


Just how much bigger would some of them be than me...thought Remy...


Photobucket


Photobucket


We even did Noah's favorite!


Photobucket


This was alot of fun and I so want to remember to do it again when we are learning about other things. You must do this one. :)


Monday, June 13, 2011

Eli's Artic Fox Poster


Elijah studied about Mammals during science and I asked him to make a poster of his favorite mammal. He came back with the idea of doing it on the Artic Fox.


He was allowed to use his dad's computer, big deal for Eli, and the printer. I showed him how to print and he did the rest on his own. I was so proud! :) I haven't blogged the homeschool history fair project he did yet. That was a very hard project for him and his first big scale project. It seems all the tears he shed over it wasn't for nothing. Seeing his fair project completed and learning how to put one together really stayed with him and I saw that in this project he did on the fox. It will be a completely different experience I believe if he chooses to enter the fair again next year. :)


Just goes to show that sometimes it is a big help to go through something hard. That project grew him in so many ways. I just looked on with a smile and total ease as he completed this little project for me. He even told me that he could turn this into a lapbook for other kids to learn from. Can we see a homeschool daddy in the making?


Photobucket


Photobucket


Photobucket


Photobucket


Photobucket


I love this kid!

Wednesday, April 27, 2011

Eli Makes a Pitfall Trap


In order to catch bugs to study in science and to supply his museum with specimens, Elijah made a pitfall trap with his brother and daddy.


First they dug a hole.


Photobucket


Next they placed a jar inside.


Photobucket


Photobucket


When they were sure it was flush they covered the sides and around the top with dirt.


Photobucket


Photobucket


The nosey weenie dogs looked on...


Photobucket


Photobucket


The last thing they did was to create some elevation with stones and lay a tricky cover ontop of the stones. They placed some fruit in the jar to attract the insects and waited. Tricky, huh?


Photobucket


Photobucket


They have so enjoyed collecting the bugs out of it. VERY BOY FRIENDLY! I had meant to do this with them for years now. We were so glad we did this one.

Sunday, April 17, 2011

Homemade Bug Habitats


Supplies:
Empty food container
Marker
Something to cut with
rubber band
1 knee high panty hose


Photobucket


Draw three circles on the sides of your container and cut them out. Have someone help by stretching the panty hose knee high out while you carefully push in the container. This will take two people. Work carefully!


Photobucket


This is what it should look like when you are done. The little cuff is handy when you have a bug in your hand. Simply put your hand in the hole, the bug will be in your hand, pull the knee high up your arm and open your hand. Once the bug is released you can slowly pull your hand out. This was such a neat bonus. I can't tell you how often the boys will lose a hard won buggy friend because they get out of the habitat when they try to put it in.


Photobucket


Photobucket


After your little visitors are inside twist up the end of the knee high and fasten with the rubber band.


Photobucket


Remy is never going to leave those butter containers alone now! Hee hee...